One of the first world problems I am unfortunate enough to experience very often, is going down to the beach for a surf, only to find out that there are no waves.
To combat this issue, I decided that a camera that live streams video of the surf conditions would be the answer.
There are some cameras that show still images at low-ish quality of the conditions of the Durban beaches, but nothing that gave me a good view of Umhlanga Rocks, where I spend the majority of my time, and none with live video, so I embarked on a journey to make something much better than those solutions, high quality live video, showing the conditions of my local beach.
Technical Overview
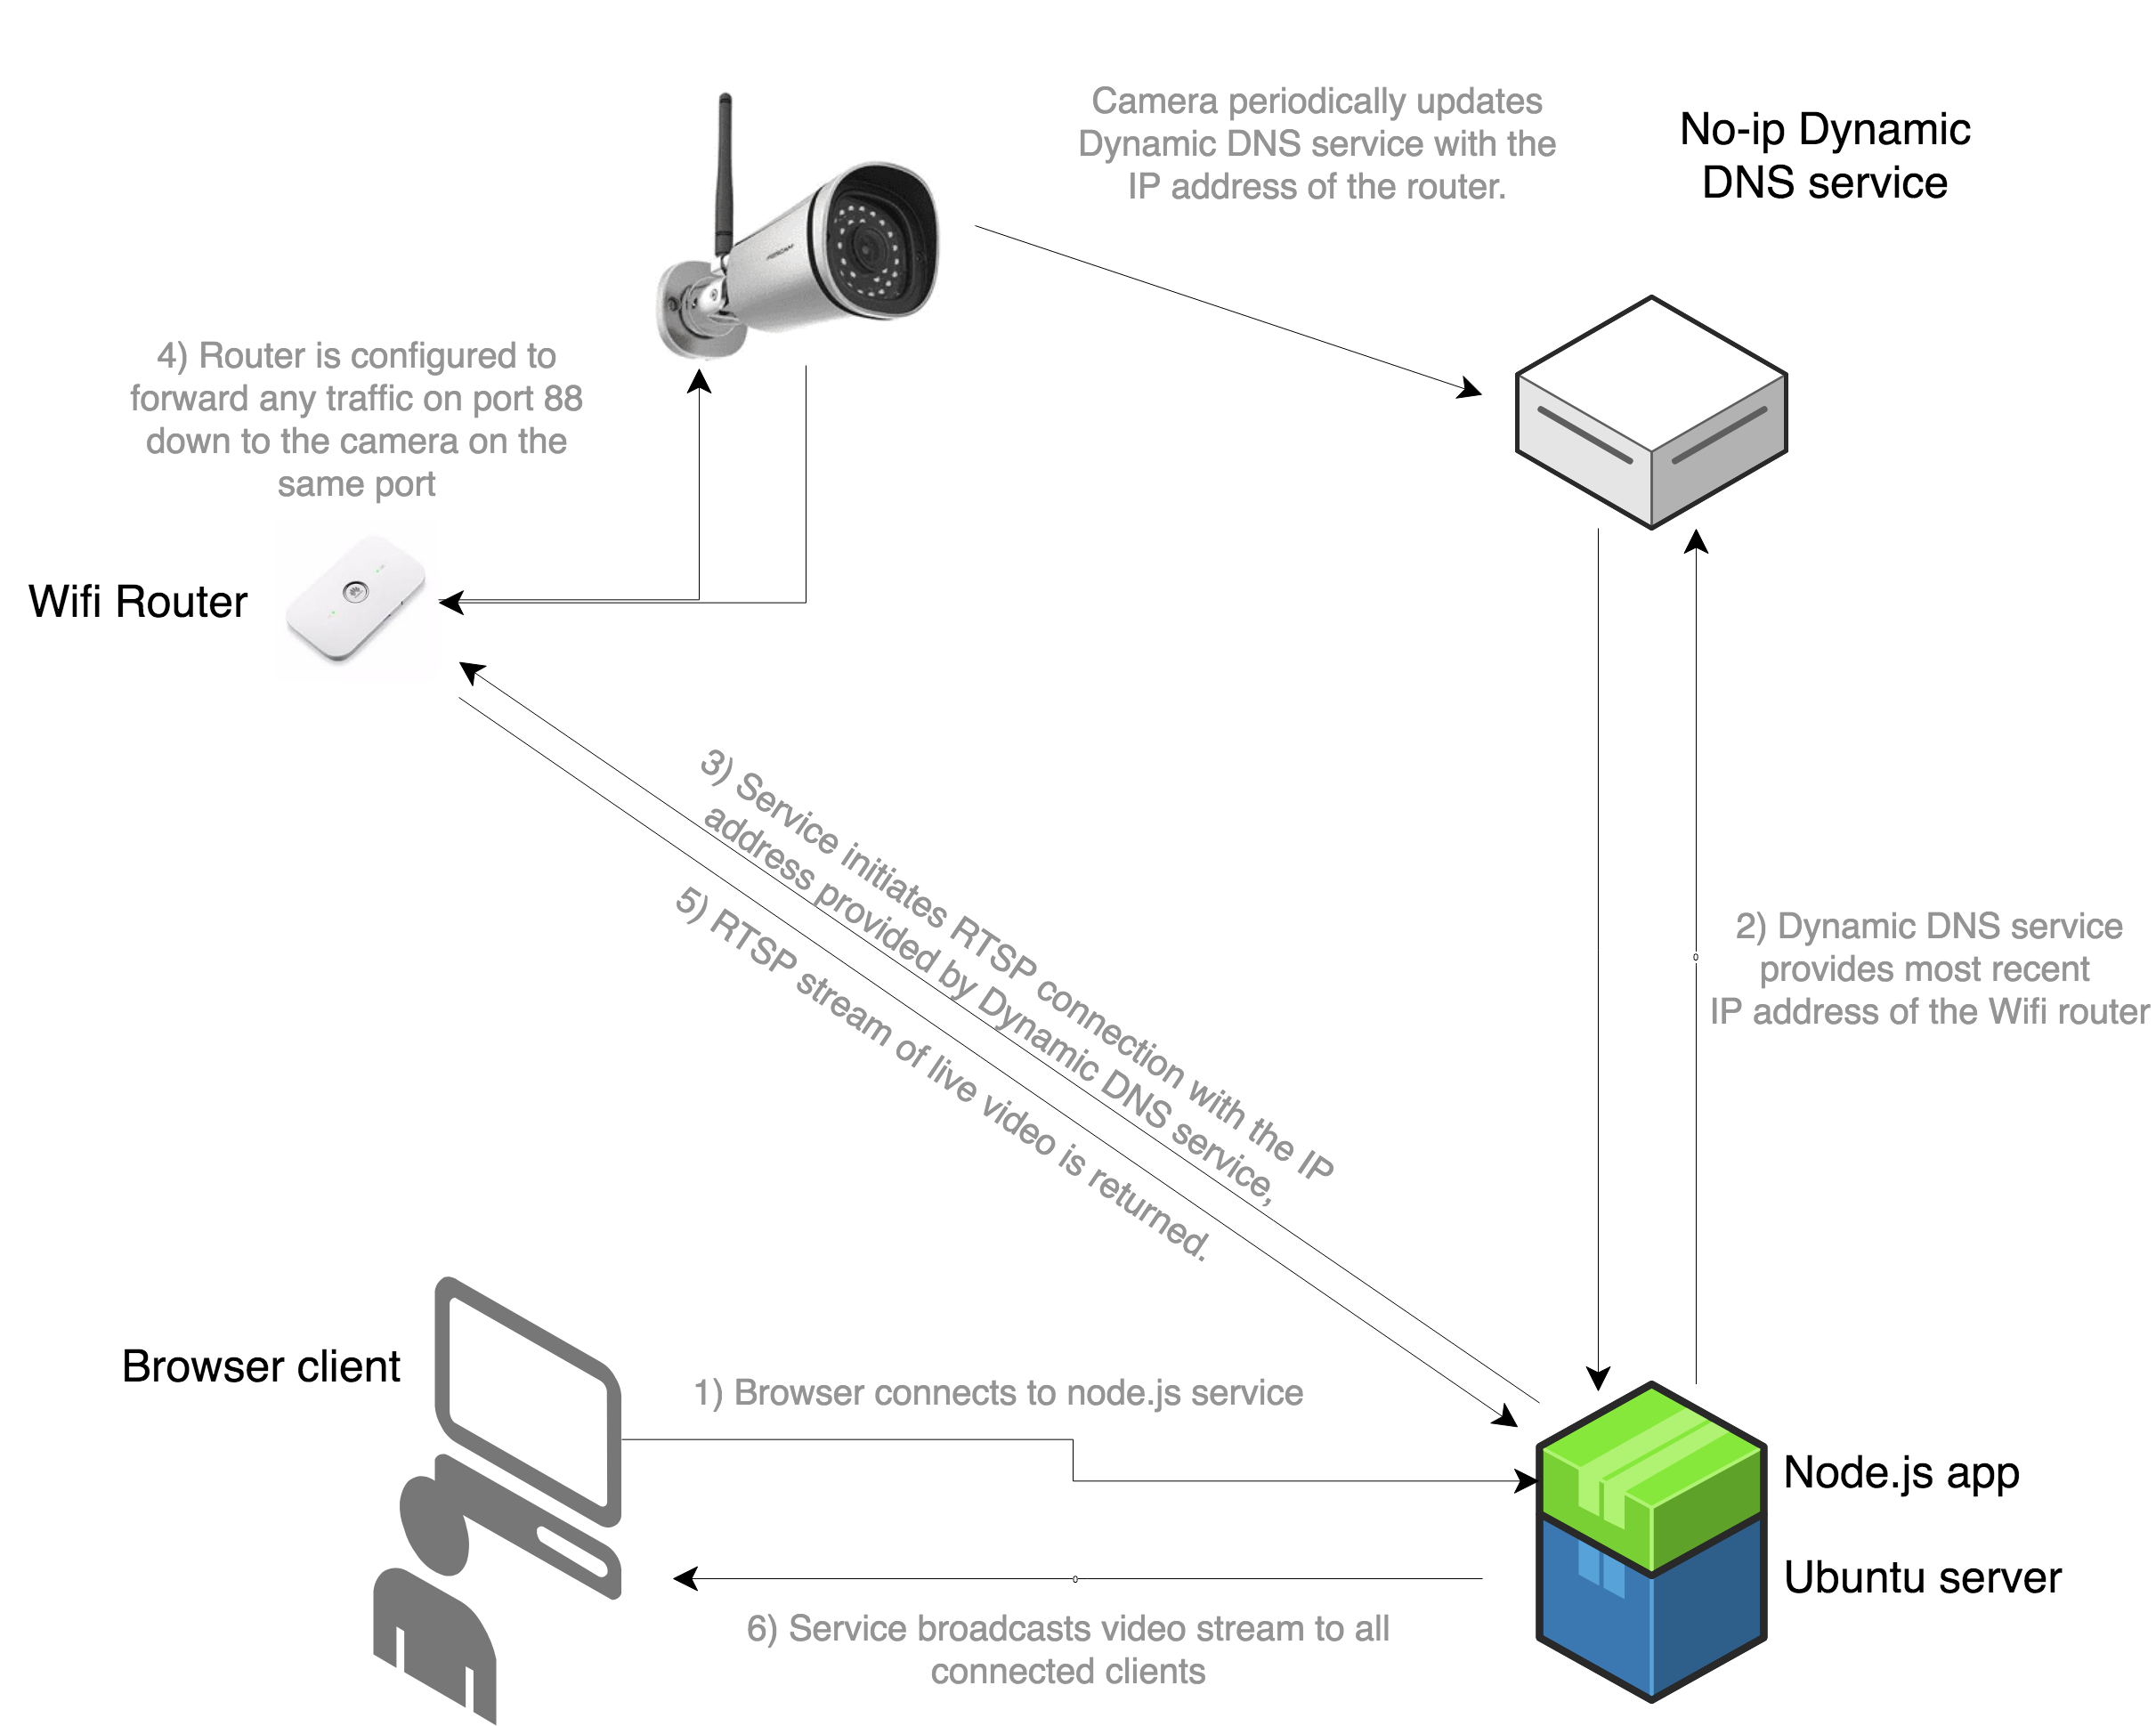
The diagram below shows each of the hardware/software components involved.
My aim was to stream high quality video to a public, browser based client, without breaking the bank on hardware or bandwidth costs. After one failed attempt at creating my own camera solution using a raspberry pi, I decided that purchasing an outdoor, wifi, IP camera was the best choice.
I also wanted to avoid using any of the streaming services as they are pretty expensive and don't give me the control I want.
The Hardware
The camera I chose is the Foscam Fi9900p. I bought it from Takealot at the time for R2000. The reason I chose this is because
- It allows access to it's live stream via RTSP: this is the protocol we will use to access the video stream.
- It has Wifi.
- It has built in Dynamic DNS capability.
- It has great video quality.
- The price isn't bad.
To connect the camera to the interwebs I used a Huawei Mifi device with a Telkom Mobile sim. Telkom Mobile was the only service provider that made it possible for my Mifi router get it's own IP address, not sharing external IP's with other devices on the same network: making it impossible to access the camera based on it's IP address.
The Software
My plan was to create a service that lived in the cloud somewhere that would connect to the camera, get the video stream from the camera via RTSP from this web app, and then serve that stream out to any clients that are connected to it.
I could have just connected my browser client directly to the RTSP stream of the camera, but this would make my bandwidth costs very high, as there would be one stream from the camera for every client that connected to it.
I host the service on a Digital Ocean Droplet, I chose Digital Ocean mostly because they advertise to me so much on Youtube, but also because they make it really easy to spin up a little Ubuntu VM that I can then access via SSH to deploy and configure my app. Their dashboard and mobile apps are also really cool and make it very easy to manage your VM.
I pay $5/month for this service, and they provide a ridiculously large amount of outgoing bandwidth for that price, so this solved the bandwidth issue nicely.
Building the Node app
https://github.com/mattstarkey/rtsp-streamer
This repo is the complete solution that you could deploy to your own web servers, it also includes the test_client.html and a simple Node.js http server that serves the client file. You will need to set a Node.js environment variable of your own RTSP stream URL called RTSPUrl for this to work.
Most of this code comes from this Github project, so most of the hard work had been done for me:
https://github.com/chpmrc/foscam_streamer
In a nutshell: The solution uses FFmpeg to create an RTSP connection to a URL, and then sends this stream out to any clients that are connected to it via WebSocket, and then renders the stream on a canvas element using a library called JSmpeg.
The core piece of code that creates the connection to the camera is this:
Stream = require('node-rtsp-stream');
stream = new Stream({
    name: 'name',
    streamUrl: 'rtsp://184.72.239.149/vod/mp4:BigBuckBunny_115k.mov',
    wsPort: 9999
});
The RTSP Url for your camera will look something like this: rtsp://username:pwd@IP:port/videoMain
The Foscam Camera Admin UI - which you can access by browsing to the IP address of the camera on port 88 - allows you to create different streams and give them a username and a password that allows access.
To conserve bandwidth, I wanted the app to close the RTSP stream from the camera when no clients were connected, and restart the stream when the first client connected to the service again.
The project was originally created using CoffeeScript, because this was already quite late at night, I made all my changes in the actual transpiled JavaScript and deleted the coffeeScript files.
Building the Client
https://github.com/mattstarkey/rtsp-streamer/blob/master/test_client.html
This is still really just a hacked together prototype-ish client I created, all in one HTML file that you can also find in the repo as index.html.
In a nutshell, it uses Jsmpeg to connect to the Node service, and then renders the stream on a canvas element.
I added some logic to disconnect the client on the 'blur' event of the window, to try and further minimise the amount of bandwidth that could be wasted by users leaving the stream open in a background tab without looking at it.
The important bit of the client, that connects to the service to access the stream is this:
client = new Websocket('ws://localhost:9999');
player = new jsmpeg(client, {
    canvas: canvas // Canvas should be a canvas DOM element
});
Networking
Networking turned out to be one of the trickiest parts of the whole project.
For the node service, or anything else, to access the camera, the IP address of the camera needs to be known. This is where the Dynamic DNS capabilities of the camera become important.
What is Dynamic DNS?
Unless your service provider provides you with a static IP address, meaning your IP never changes, you will be faced with the problem of not knowing what the IP address of your camera is, as the IP of your mobile internet connection will change all the time. This means that the Node service will not know the address of your camera, and will not be able to connect to it.
Dynamic DNS allows the camera to inform a third party service of it's IP address, which keeps a record of this address, and assigns a nice readable name to it that your Node service can use to get it's most up to date IP address. The camera updates this service periodically, so that the Dynamic DNS service should always know the IP address of your camera, and the nice readable name that is assigned to it will always point to the correct address.
I used the No-IP free Dynamic DNS service. Create an account and choose a host name.
The Foscam admin interface has a section where you can set up third part Dynamic DNS services.
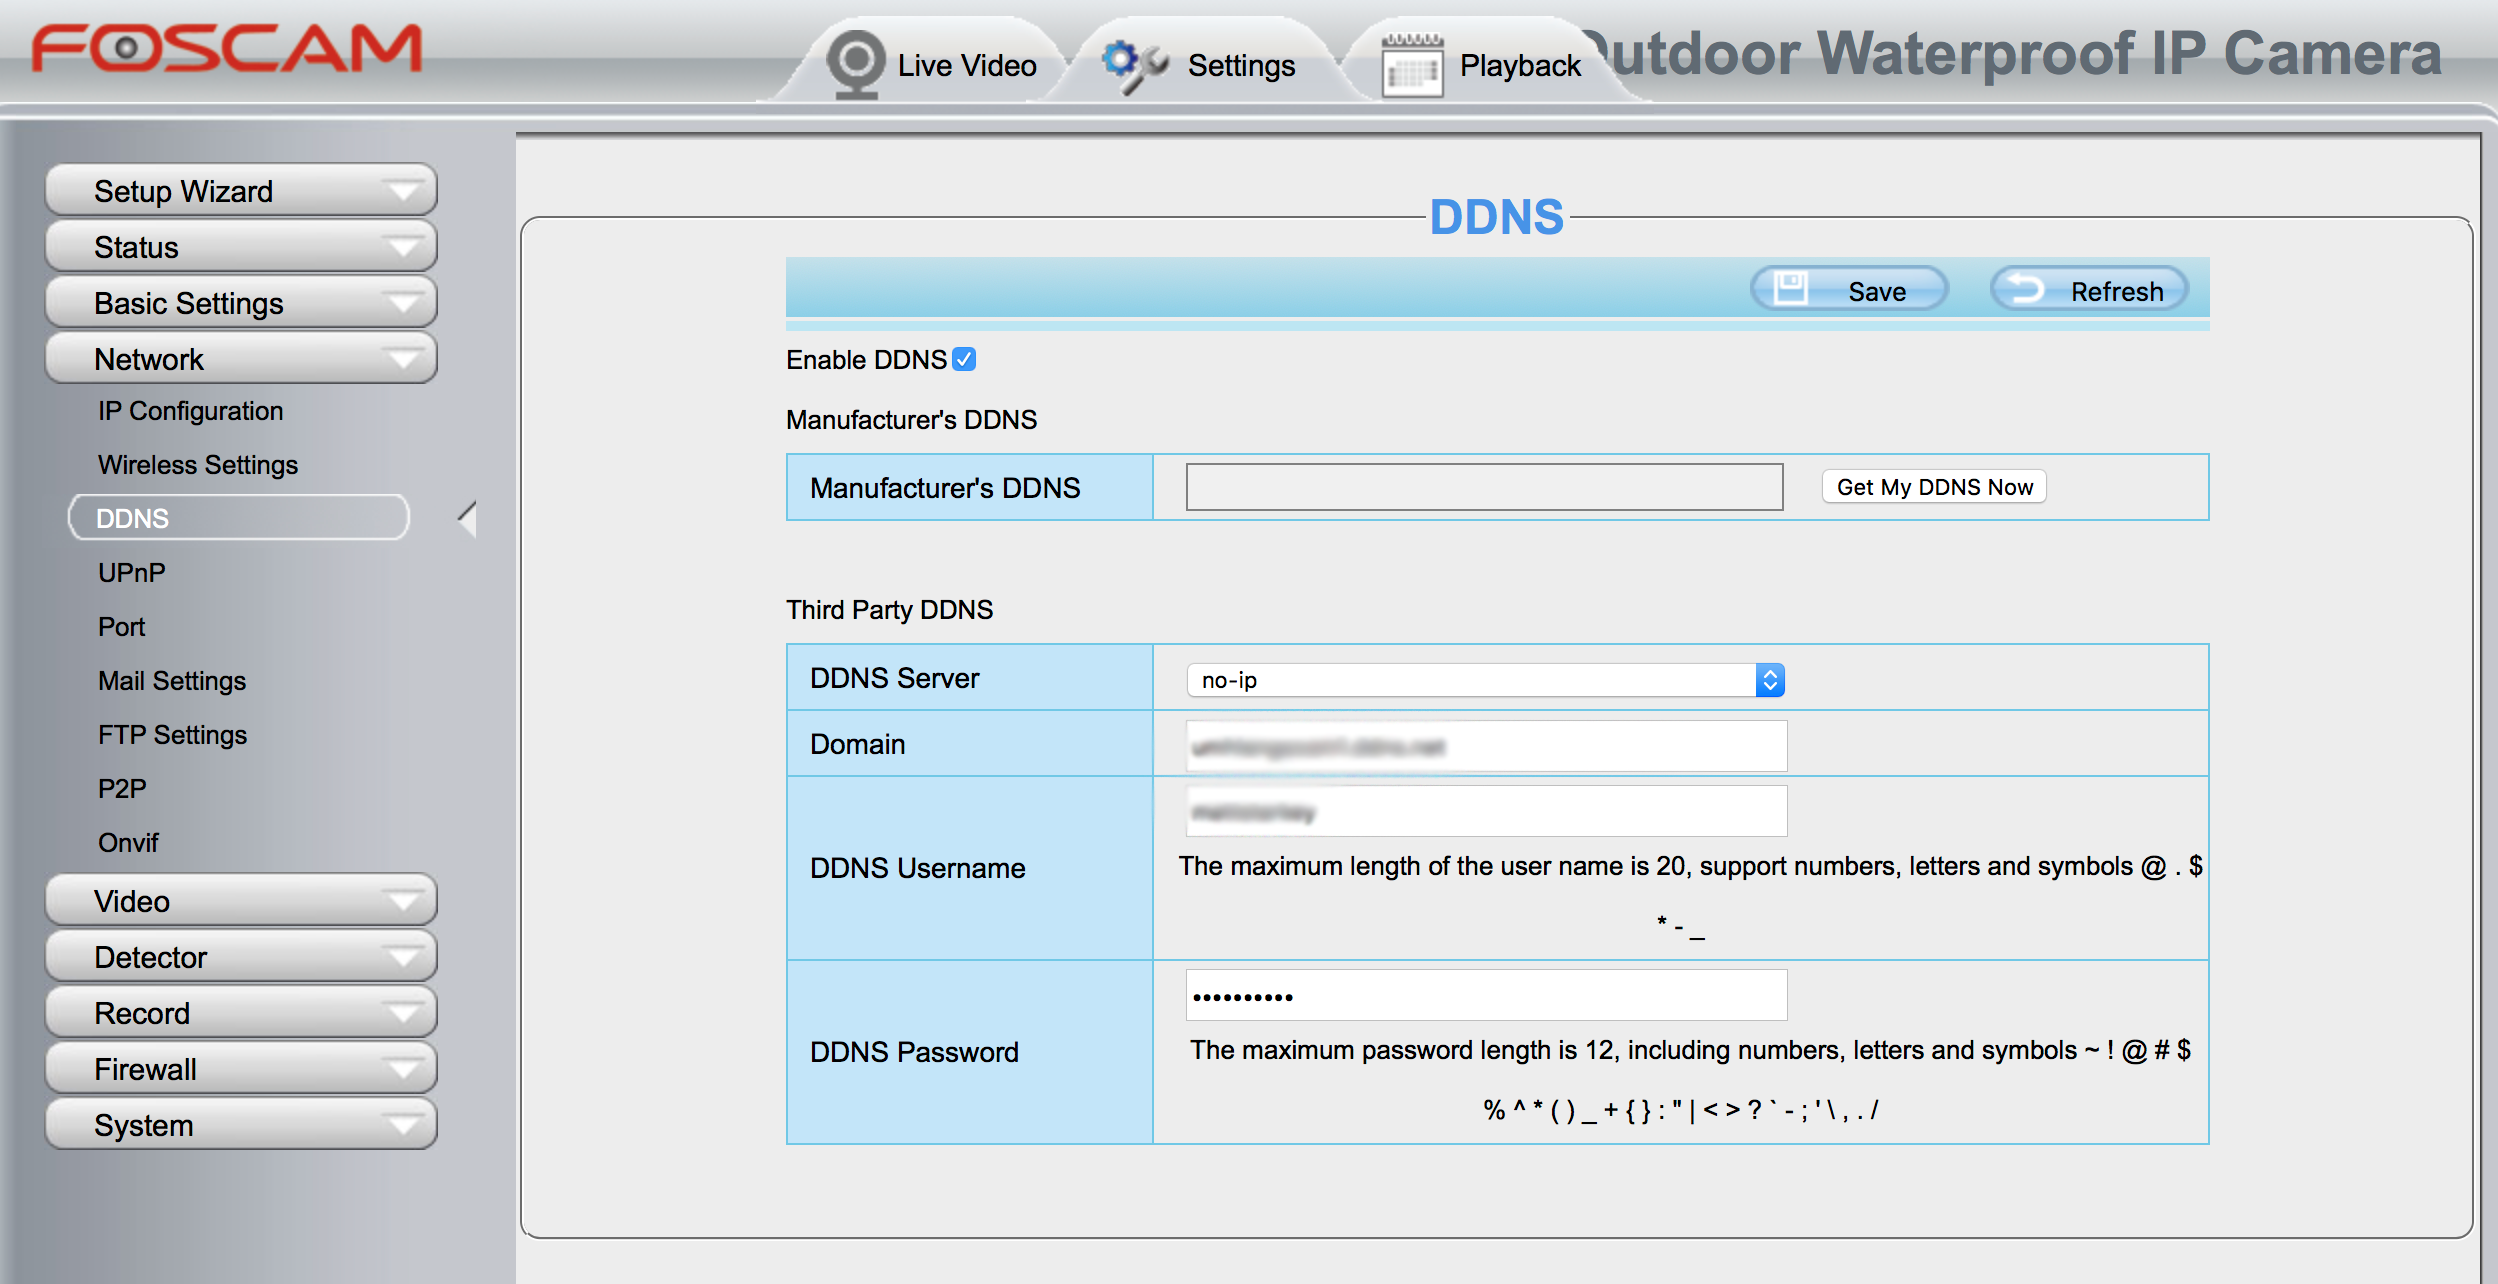
Select your Dynamic DNS service provider and enter the details provided to you by the service and click save, you camera will now update the Dynamic DNS service with it's IP address!! Hooray!!
But don't be breaking out the champagne just yet now, there is another obstacle you must overcome:
The IP Address of your camera is not really the IP address of your camera....
All of the devices on your mobile router have the external IP address of the router.
This means that if, for instance, your iPhone, your laptop, and your camera are all connected to the internet via this router, they will all have the same external IP address. So we will need further config to know which device we are trying to access when we hit that IP address from somewhere externally, in this case: from your Node.js service.
Important Note - Many networks do not give your router it's own IP address, I initially chose Rain Mobile as a service provider because they offer a great package that gives you unlimited bandwidth between 10pm and 6pm. This turned out to be a horrible mistake and I spent many hours trying to figure out why I could not access my camera from outside my network.
Port Forwarding
We need to forward incoming traffic to your router on a specific port to the local IP address of your camera on port 88.
Port forwarding is a way to point that external IP address you have, that belongs to your router, to the device you want to connect to: your camera in this case.
The Foscam RTSP stream is available on port 88 of the Foscam camera I used. This means you need to forward a port on your router to the internal IP address and port of your camera. You will need to google how to do this on your particular router.
The router I used is a Huawei B315, and this video shows exactly how to configure port forwarding for this device:
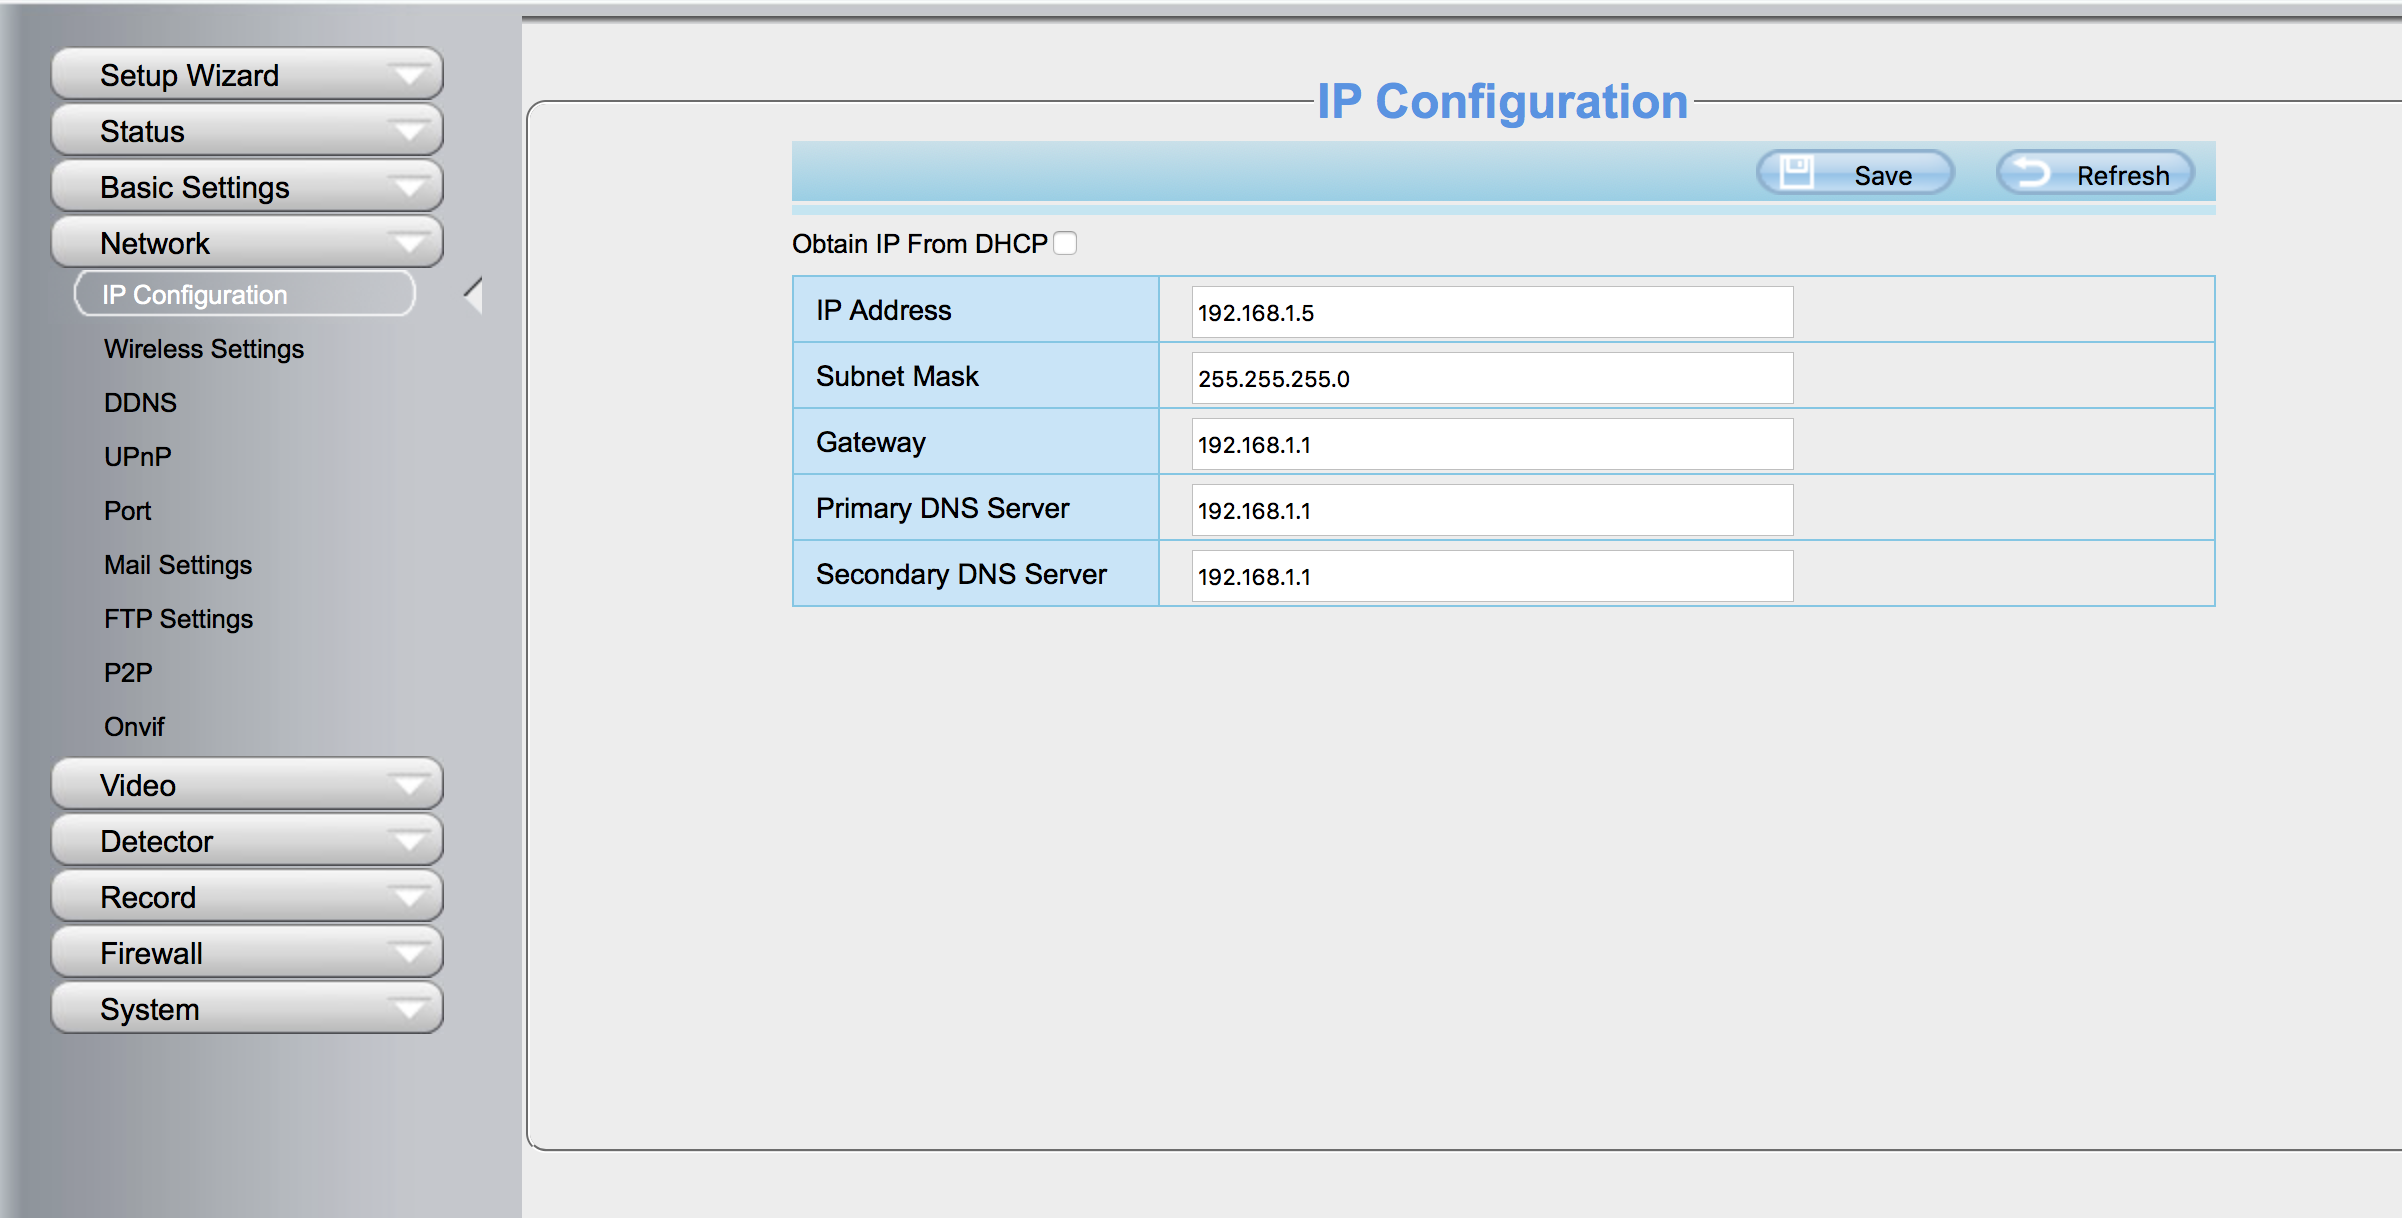
You will also need to assign your camera a static internal IP address, so that when it connects to your router, it always has the same address, and the port forwarding can work correctly. You can do this in the Foscam admin UI as well.
My Solution
My full solution is available on Github in the following repo:
https://github.com/mattstarkey/rtsp-streamer
It is very much a work in progress at the moment, but it gets the job done.
You can check out my live stream at the following URL: